|
MIDL User Guide
|
|
Last updated:
|
| Table of Contents |
- Context and purpose
- How MIDL works
- Preparing your device for remote access to MIDL
- Accessing MIDL
- Using MIDL
- Transferring files in to and out of MIDL
- Signing out of MIDL
- Support
|
| 1. Context and purpose |
| This user guide is intended for new and existing Data Users of the MIDL who have completed the MIDL Security Awareness Training and have been approved for data access within the MIDL. For more information about the terms and conditions for accessing the MIDL, please refer the MIDL Acceptable Use Policy. |
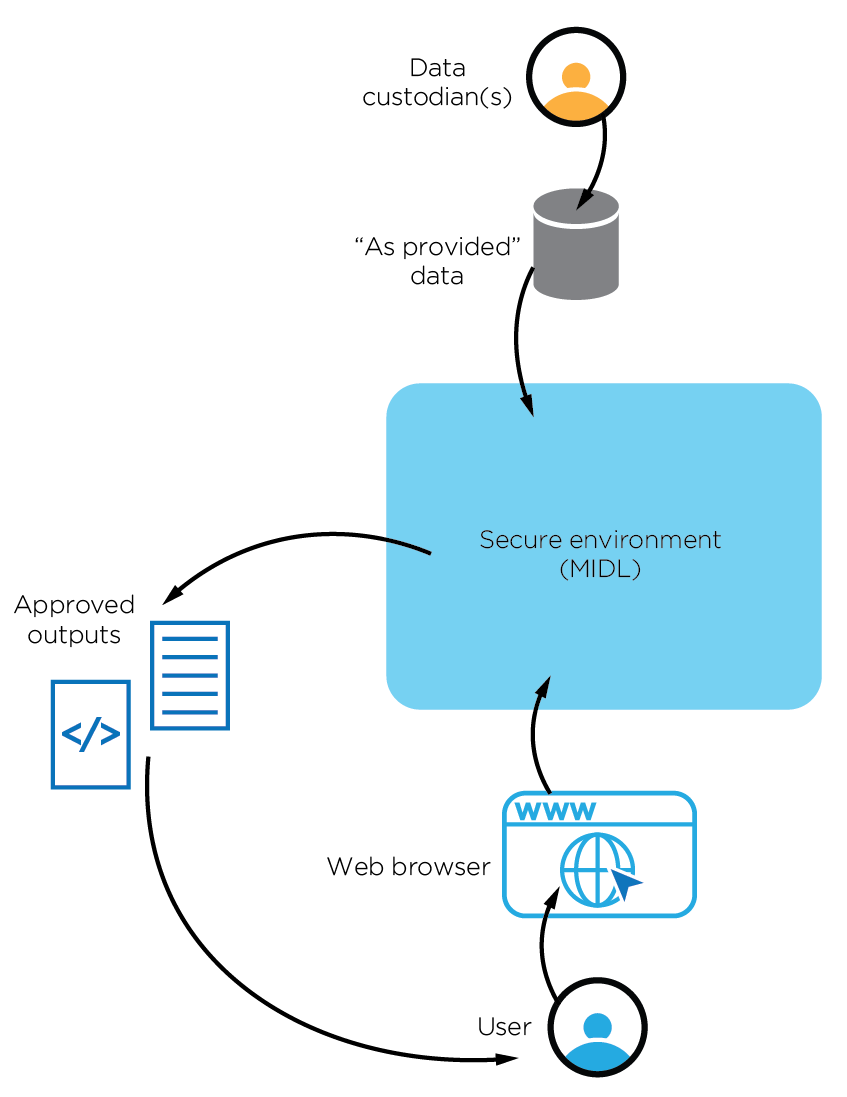
| 2. How MIDL works |
| MIDL works by creating Virtual Desktops for users to access remotely from anywhere in Australia. These Virtual Desktops allow access (read-only) one or more approved data sets from a Data Custodian (or multiple Data Custodians) that users are approved to access. They also contain the statistical packages needed for data analysis. Users access these Desktops using a web browser application on their computers. No data is stored on the user's computing environment, and no data or outputs of project work inside the MIDL can be taken outside the MIDL environment without vetting or clerance. This is to ensure that outputs are not disclosive and the confidentiality of units within sensitive data are maintained. Information security controls can vary between projects depending on the sensitivity of the data. The terms of access (including infosec controls) of each project are set out in the Project Schedule. |
What is a Virtual Desktop?
A virtual desktop is a software emulation of a hardware device that runs on a physical or virtual machine at a remote location, hosted either on premises or in the cloud. In the case of MIDL, a virtual desktop runs on an on-premises cluster hosted in Melbourne, Victoria. Compute resources (CPU, RAM and storage) are shared across hundreds of virtual desktops that are started and stopped depending on demand. A series of information security controls are in place to ensure only approved data sets are accessible from a project and project-level data is only visible from inside the project. MIDL emulates a Windows 10 environment that hosts a range of statistical packages needed for data analysis. More information on statistical packages available inside the MIDL can be found in this guide.
|
| Methods of access |
MIDL provides two methods of access to data: through a standalone project or through a project within a Shared Data Environment hosted within the MIDL.
- Projects are defined by the research topic/question set out in the Project Application Form. Approved users of the project have access to the data sets that have been approved for access and the project work is limited to the scope defined by the research question and project objectives.
- Shared Data Environments (SDE) are specialised project workspaces that are defined by research themes and can consist of multiple projects that are aligned under the research theme. Each SDE can have a large number of data sets approved for use by Data Custodians with each project within the SDE using a subset (or all) of these data sets.
For more information on Projects and Shared Data Environments, please refer the MIDL Information Pack.
|
| First steps |
| In order to access the MIDL, you must:
|
| 3. Preparing your device for remote access to MIDL |
| To access the MIDL, you have to first setup your computer (device) to access the MIDL environment. It is recommended that you use the computer that has been provided to you by your organisation. This ensures the computer you use to access the MIDL is in compliance with relevant information security and cybersecurity policies set out by your organisation. If you have any issues setting up your computer to access your virtual MIDL environment, please seek assistance from your organisation's IT support team. |
| Anti-virus and firewall |
On Windows:
- MIDL recommends a minimum of Windows Defender Antivirus and Firewall on Windows 10 devices (this comes as default on Windows 10 devices - please refer Microsoft Windows Defender documentation for more details).
On Mac:
- If you are using a Mac device, any anti-virus package that you may have installed will be sufficient. Otherwise we recommend Sophos Home Free that can be directly downloaded from the Sophos website. To set up the Firewall in Mac OS (version 10.14 and newer), please follow the instructions provided below:
- Open System Preferences, and select Security & Privacy
- Choose Firewall and click the padlock icon to login and enter the administrative password
- Click Turn On Firewall
|
| Regular updates |
Please ensure that your operating system is regularly updated with the most recent software patches.
On Windows:
- To manage your options and see available updates, select the Start button, go to Settings > Update & Security > Windows Update.
- For more information, please see Microsoft's documentation on how to update the Windows operating system.
On Mac:
- Choose System Preferences from the Apple Menu, click Software Update to check for updates.
- Select the tick box Automatically keep my Mac up to date to enable regular updates.
- For more information, please see Apple's documentation on how to update the Macintosh operating system.
|
| Required software packages |
1. Web browser
- MIDL recommends the Google Chrome web browser or the Mozilla Firefox web browser as we have had minimal issues with their integration with the Citrix Receiver software application that is used to access the MIDL Virtual Desktop.
IMPORTANT NOTE: Depending on how many other secure environments you access that use a Citrix solution for desktop virtualisation, you may need to use your browser while in incognito mode or private browsing mode. Please refer the relevant documentation for the browser you are using.
2. Citrix Workspace application
- MIDL uses the Citrix Virtual Apps and Desktops software to deploy virtual desktops inside MIDL. To access your MIDL Virtual Desktop, you need additional software to be installed on your computer. Please ensure you have the latest version of Citrix Workspace installed on your device before attempting to login to MIDL. You may need to request this software application from your organisation's IT support team. The Citrix Receiver application is mentioned on some of the prompts when accessing the MIDL. This is an older version of the Citrix Workspace application that is no longer supported by Citrix.
IMPORTANT NOTE: It is recommended you use the latest version of Citrix Workspace when accessing your virtual desktop within the MIDL.
- Navigate to the Citrix Workspace App download page and select the operating system of your computer to find the appropriate installation package.
3. Okta Verify
- MIDL uses the Okta service for its Multi-Factor Authentication (MFA) service. Please follow instructions you have received via email to setup the Okta Verify application on your smartphone and register your smartphone as a device that will be used to authenticate you to access MIDL.
|
| 4. Accessing MIDL |
The following steps lay out the method to access the Melbourne Institute Data Lab from your remote location. There is no non-remote way to access MIDL.
- Open up your web browser (see above for recommended applications) and access the MIDL login web page using the MIDL landing page.

- Login to the Melbourne Institute Data Lab using your provided MIDL user name and password. This is set up separately through the automated emails from MIDL that you receive when your account was created.
- You will be prompted with a multi-factor authentication (MFA) challenge through Okta. You will need to select Send Push and then complete the challenge using the Okta Verify application on your smartphone.

- Once the MFA challenge has been completed, you will be presented with the following web page that shows two apps that you can access. Citrix Workspace Launch launches the landing page that shows all the projects on MIDL that you have access to. ShareFile launches MIDL's solution for transferring files in to and out of the MIDL environment. Please see this section of this guide for more information.
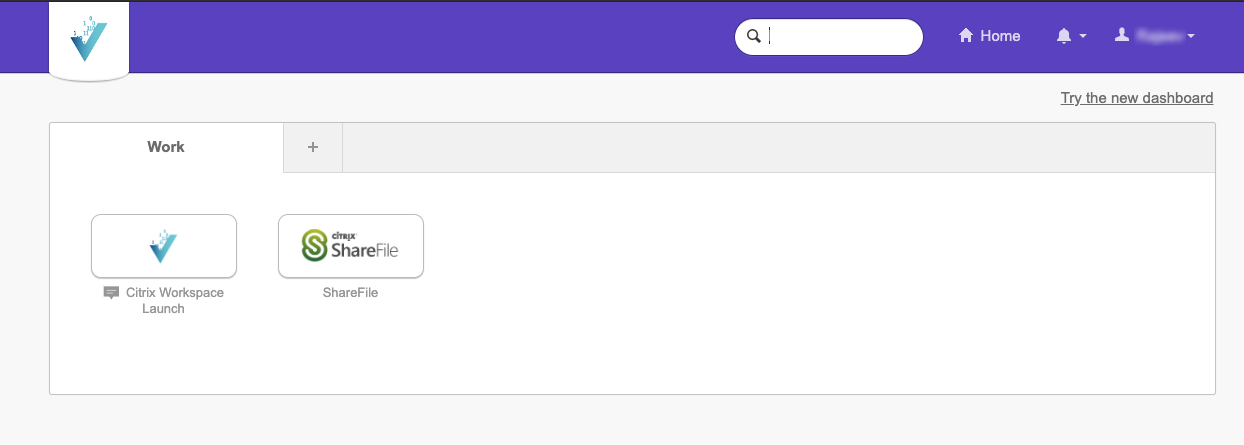
- Select Citrix Workspace Launch to access the workspaces page.
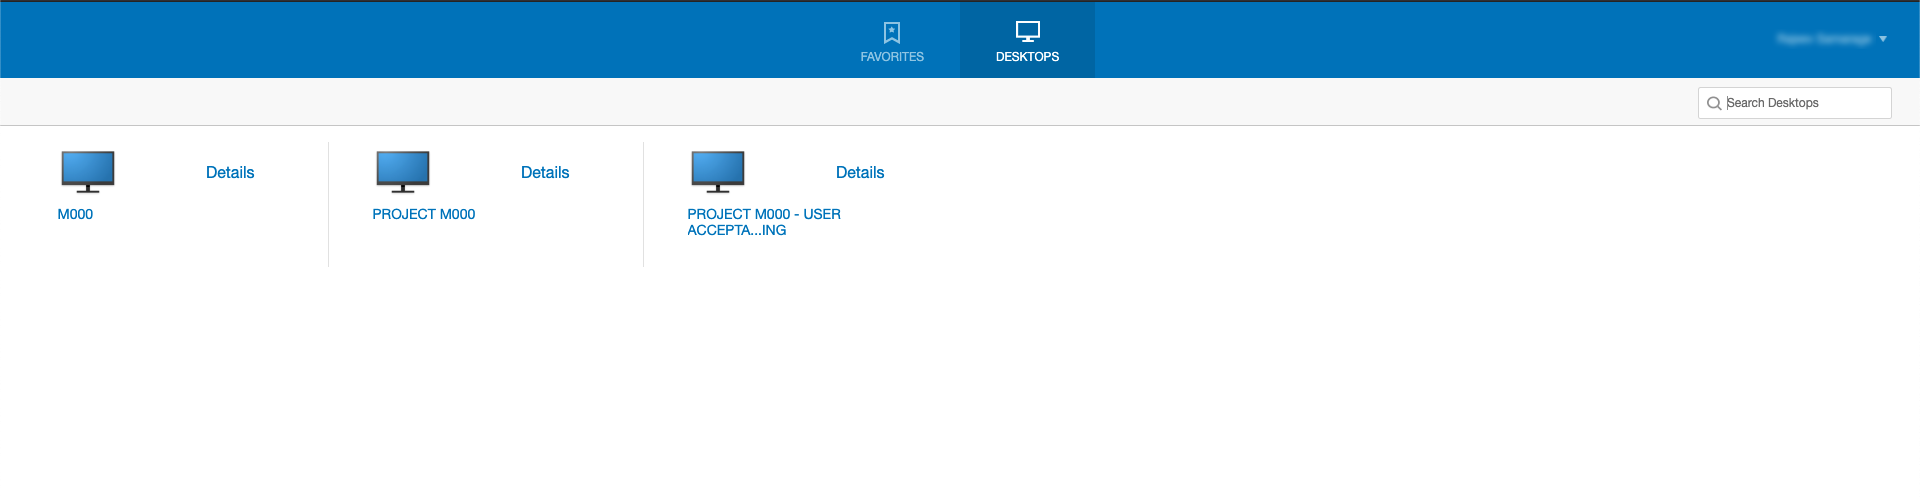
- Click on the relevant desktop icon to launch a Virtual Desktop for that project in MIDL.
EXPERIENCING ISSUES? Once click on an icon (computer icon), a scrolling animation starts at the top of the icon. Do not click the icon again when this happens. Your desktop is being orchestrated with the server. This can take between 1 and 5 minutes.
PRO TIP! Once your desktop is ready, an ".ica" file is downloaded to your computer. Clicking on this file will open the Citrix Workspace application on your computer to launch your Virtual Desktop. You can set your browser to automatically open this file in the future. Please see this Citrix support article on how to do this.
- If you are accessing the MIDL for the first time, this action will direct you to a new page that will attempt to detect the Citrix Workspace application that should be installed on your computer.
IMPORTANT NOTE: This prompt references Citrix Receiver but both Citrix Receiver and the newer Citrix Workspace package will work here. It is recommended you use Citrix Workspace to access your virtual desktop within the MIDL.
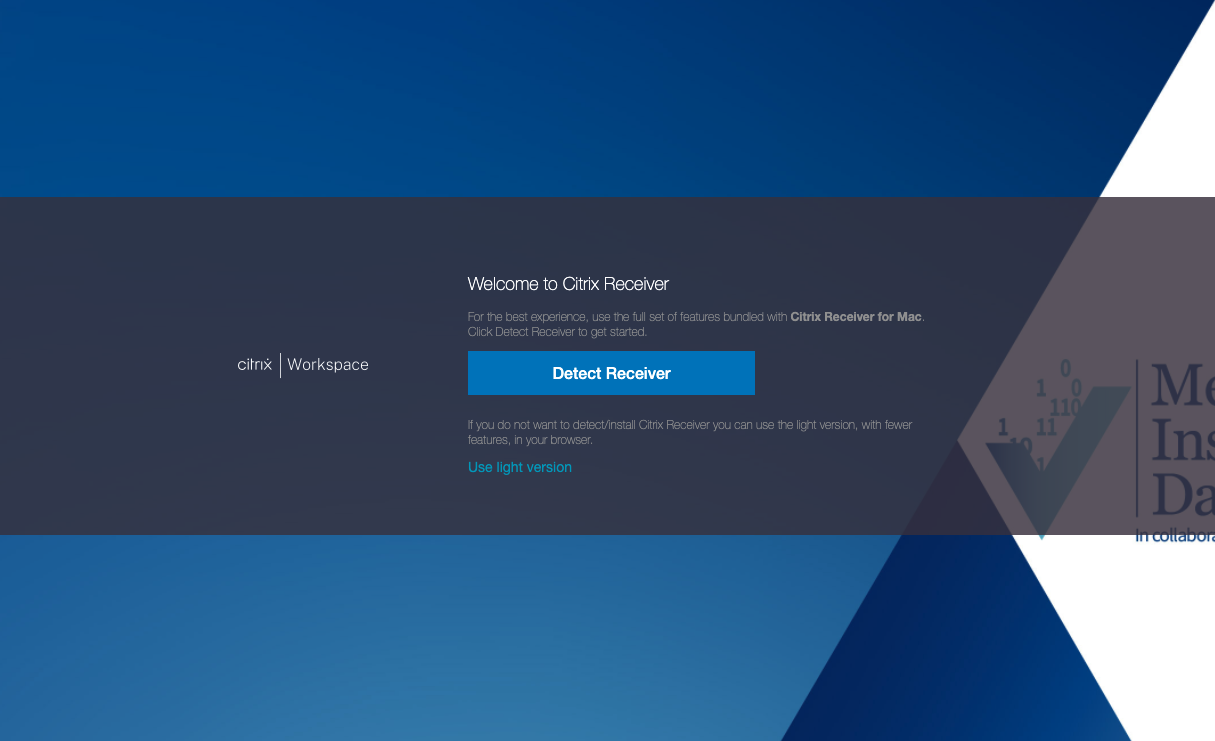
- On this screen, select Detect Receiver. This action should open your Citrix Workspace application and load the Virtual Desktop to the nominated project in MIDL.
EXPERIENCING ISSUES? This screen has been tested and is known to work without issues with Google Chrome. If you continue to have issues, you may select Use light version which would open the Virtual Desktop directly on your web browser.
EXPERIENCING ISSUES? If you have issues on this step, please check that you are using incognito mode or private browsing mode as recommended earlier when setting up your browser.
EXPERIENCING ISSUES? Please ensure you have the latest version of Citrix Workspace installed on your computer.
STILL EXPERIENCING ISSUES? If you continue to have access issues, please contact the MIDL Service Desk team.
- You would now be presented with another Windows login screen where you need to re-enter your MIDL credentials again.
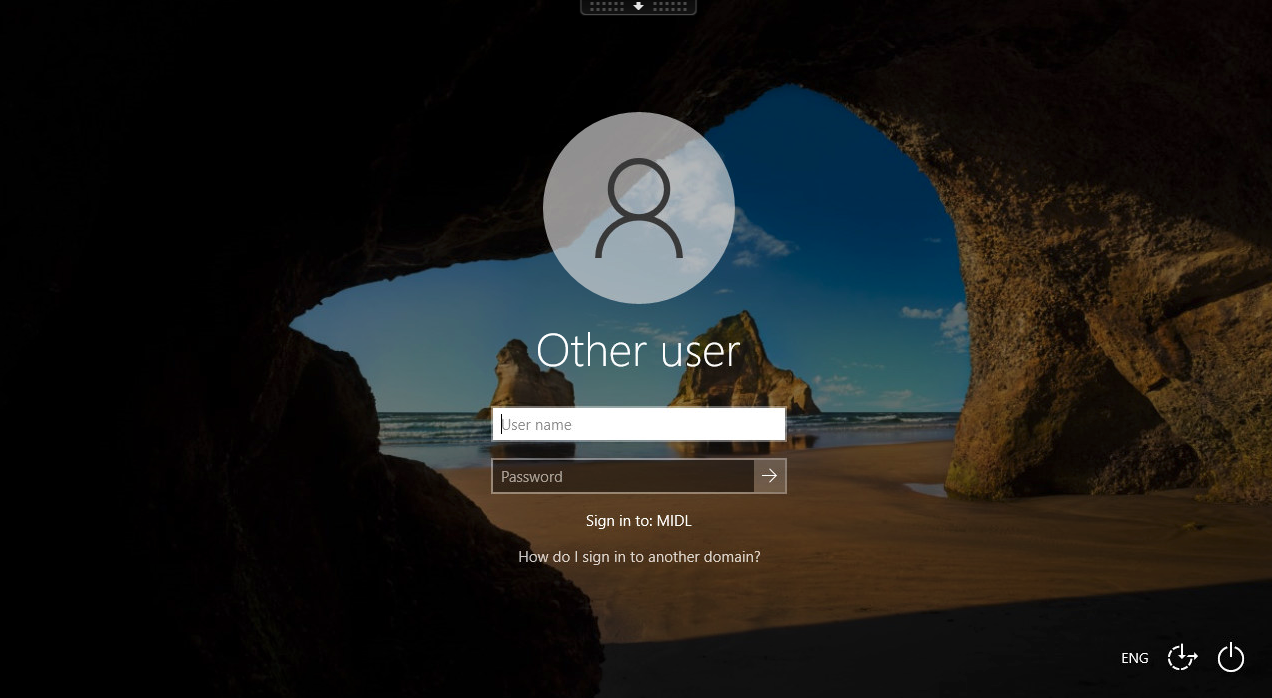
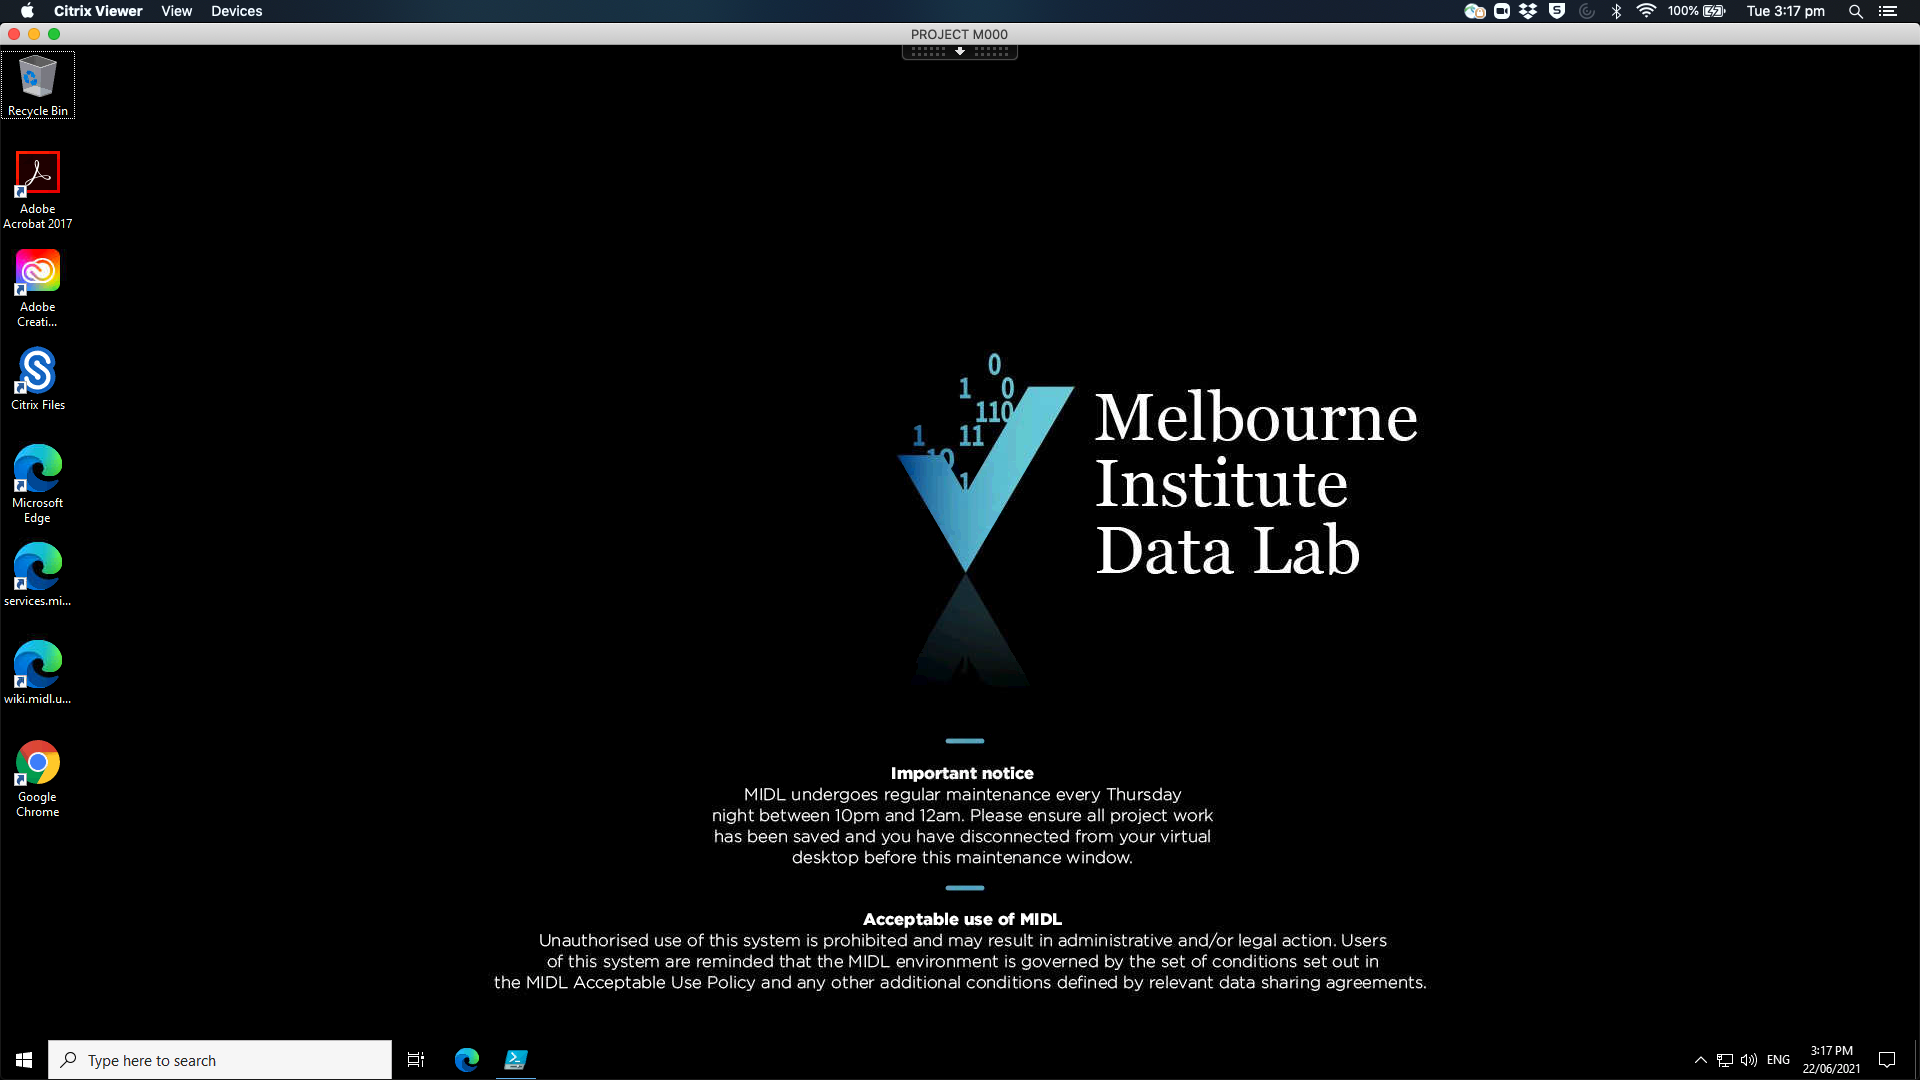
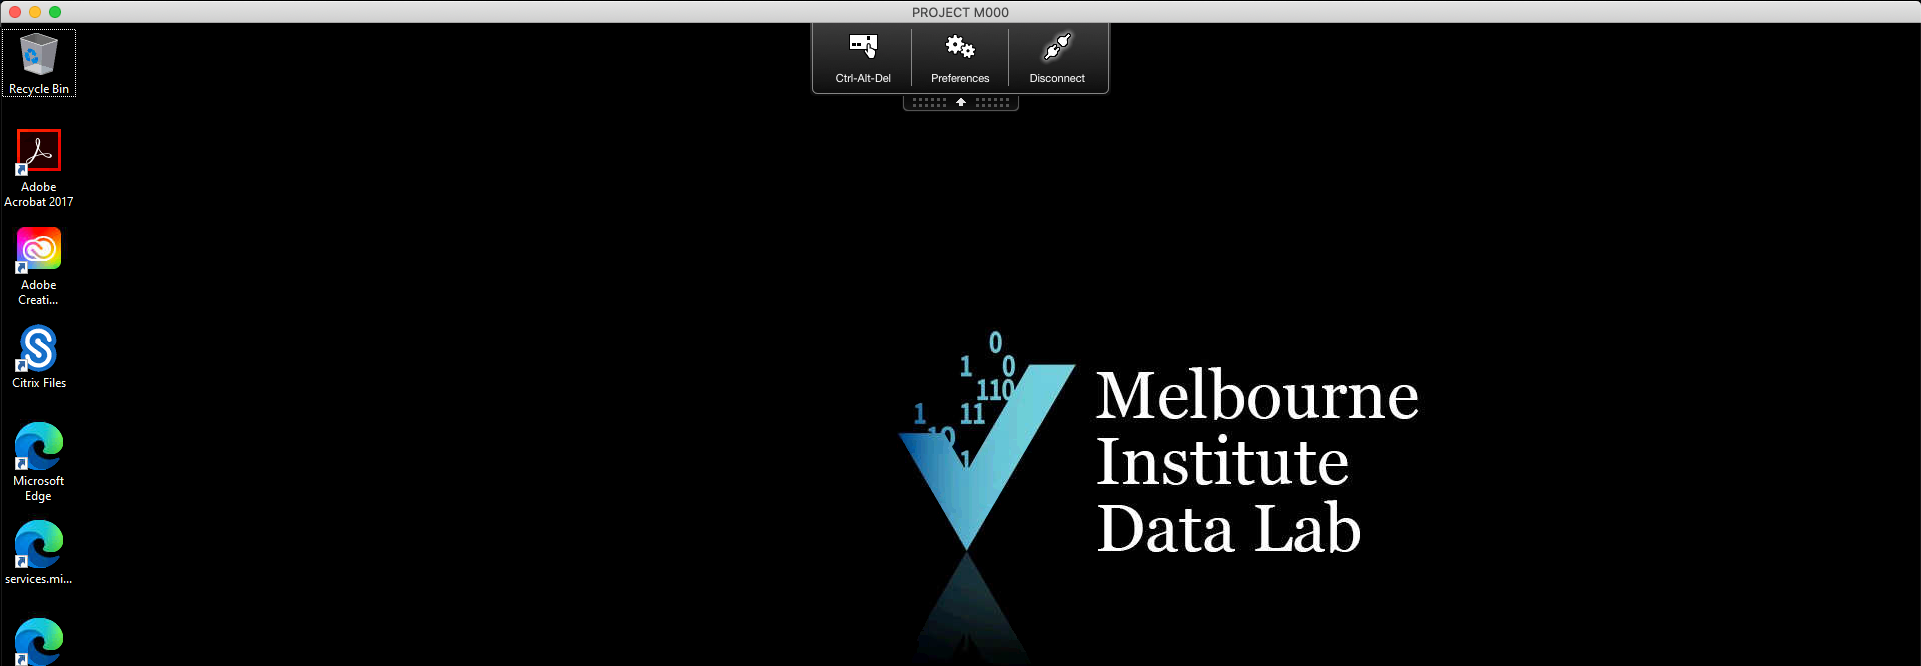
- Upon successful login to your Virtual Desktop, you will be presented with your Virtual Desktop environment that contains your statistical software packages, access the MIDL wiki and the data sets associated with your project.
|
| 5. Using MIDL |
| Drives and folder structures |
- Access the File Explorer by selecting the Start button and clicking on the Documents icon. Then select This PC to see the mapped network drives.
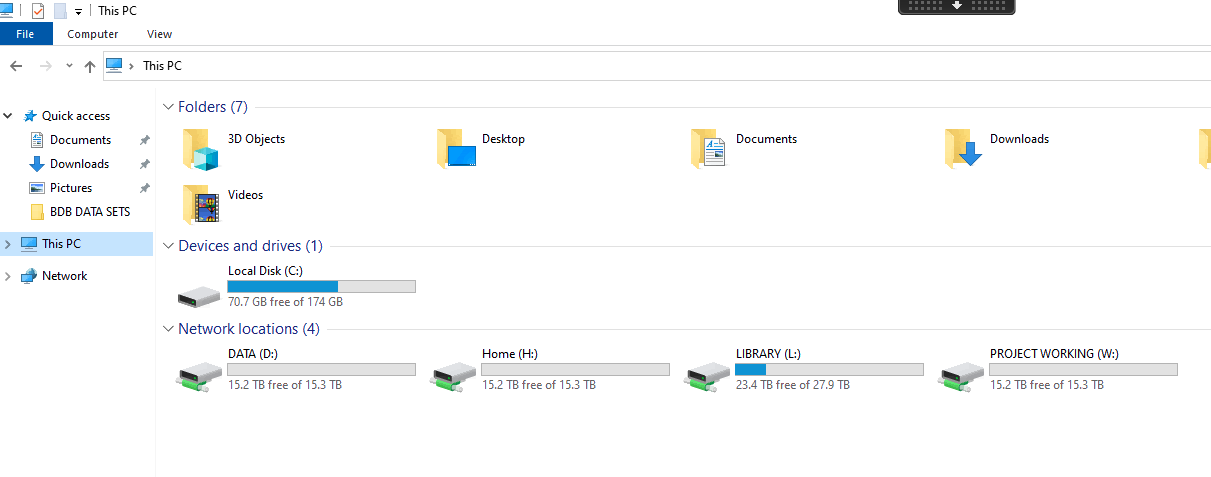
- Each virtual desktop utilises the following drive mappings to support project activities:
- D: DATA: Data made available for your project is accessible through this drive. The D drive also hosts the DATA CURATION folders used to transfer files in to and out of the MIDL environment. Data provided by Data Custodians will have strict folder permissions and users will only have read access to these folders. Data provided by users and approved for use within the MIDL environment will be in folders that users have both read/write access to.
- H: HOME: This folder contains your home folder and content that is specific to your user account under the project you are logged in to. You may use this folder to do project work as it is also backed up and archived like the other folders. However, other users in your project cannot see the contents of these folders. You can use the W drive (see below) to store project work that needs to be accessed by other users in the project.
- W: PROJECT WORKING: This folder is meant to be used to store data analyses and other documents relating to your project. All users within the same project (unless strictly controlled) have read/write access to the contents of this folder.
- L: LIBRARY: This folder is a resource folder that is all Data Users can see from their Desktops. It provides access to some openly available resources such as the Australian Geographical Boundaries provided by the Australian Bureau of Statistics. The library folder also contains copies of the MIDL Information Pack and other information relating to the Shared Data Environments within the MIDL.
- All contents in the drives described above are backed up nightly and retained for a period of three months. A weekly backup is performed to an external cloud service and retained for the period you set out in your Project Application Form. Default data retention period for this weekly backup is 5 years.
|
| Wiki solution |
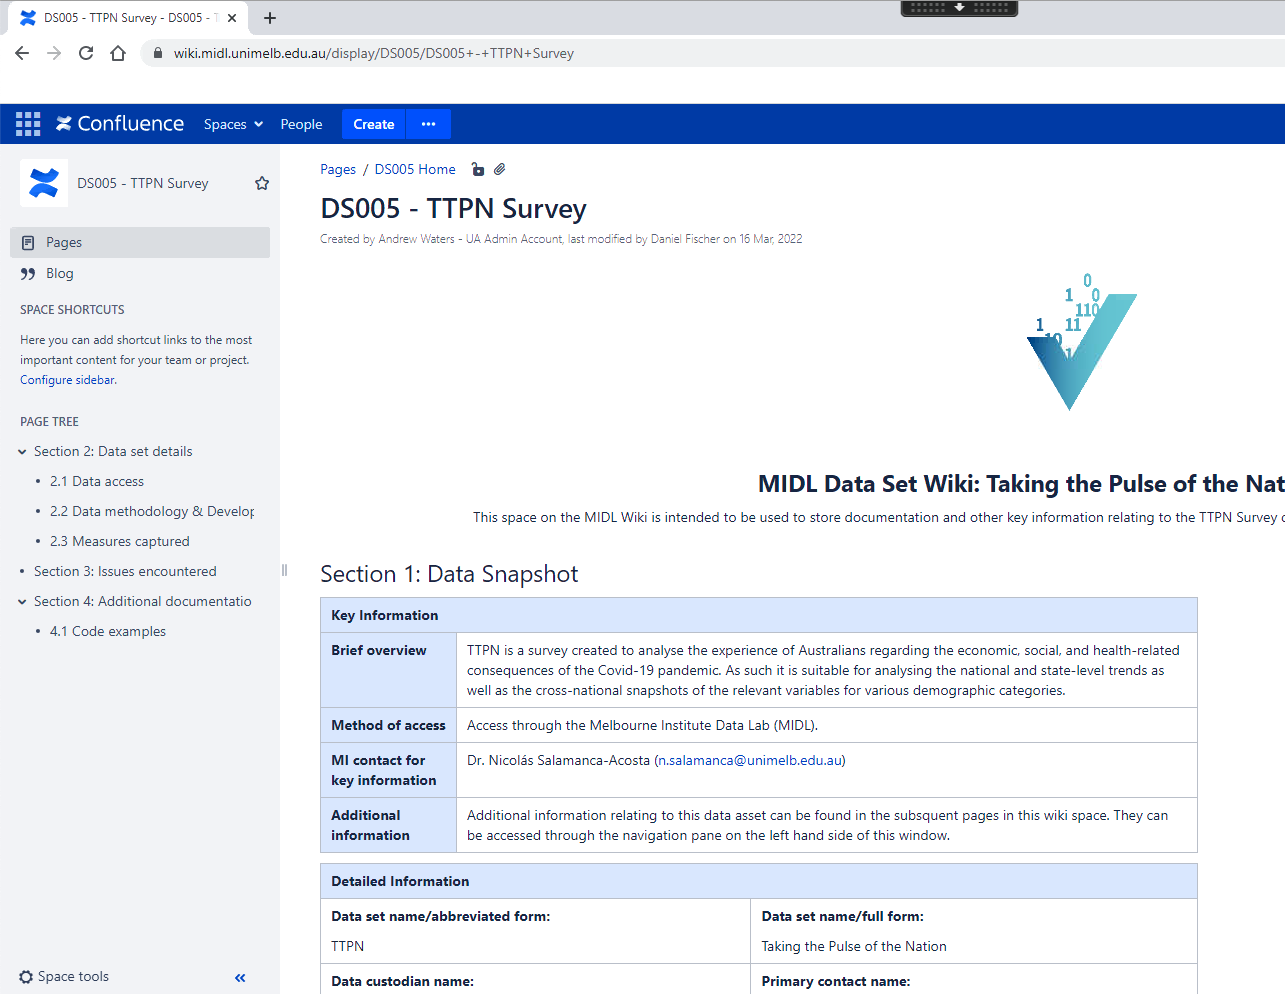
- The MIDL uses an internal Wiki solution to house a range of resources that support projects and Shared Data Environments hosted in the MIDL.
- To access the MIDL Wiki, select the icon titled Wiki on your MIDL Virtual Desktop, or, open up Google Chrome or Microsoft Edge from within the environment and navigate to https://wiki.unimelb.edu.au/. Login using your MIDL credentials to access the MIDL Wiki.
- Once logged in, access the Space Directory to see which Wiki spaces you have access to. You can access the Space Directory by selecting Spaces from the navigation pane at the top, and selecting Space Directory at the bottom of the list.

- The MIDL Wiki grants you access to Data Memos that contain additional information about data sets hosted within the MIDL. These information includes data snapshots that provide key information on the data set, extensive information on what measures are captured, variable definitions including additional variables that have been added, and code examples on how to replicate creation of 'research ready' versions of this data set.
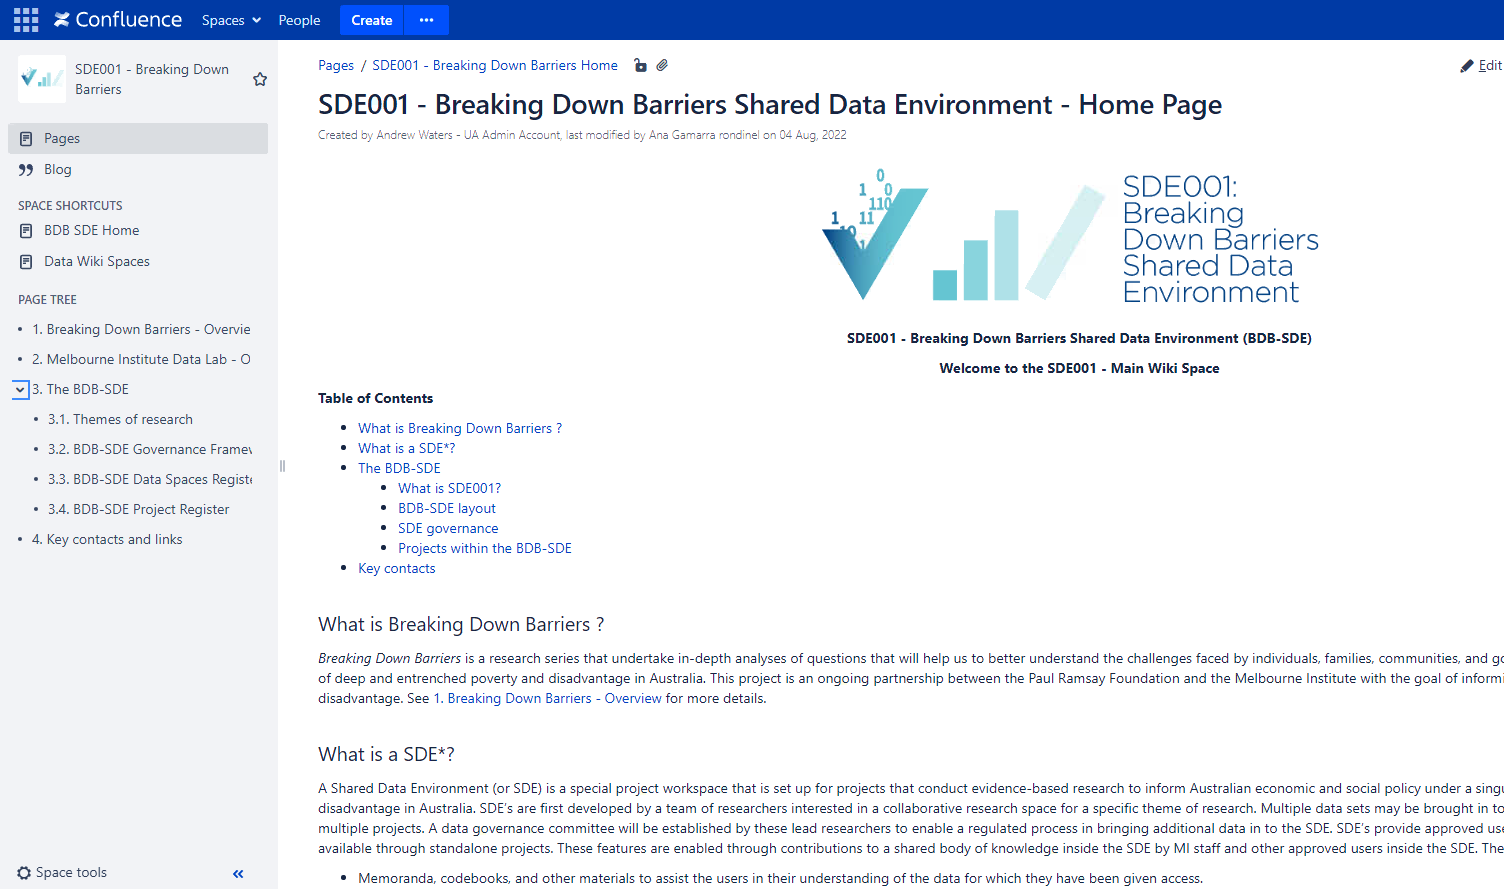
- If you are accessing a Shared Data Environment (SDE) within the MIDL, the MIDL Wiki also hosts specialised portals for each SDE. These portals inform the user about the SDE's mission and objectives, key research themes, additional information about governance structures within the SDE, and a list of projects and data sets within the SDE.
|
| Software packages available |
Each Virtual Desktop within the MIDL has the following software and statistical analysis packages/programming languages installed.
- Stata MP
- SPSS
- SAS
- RStudio
- Anaconda 3 / Python 3 with Jupyter Notebook
- StatTransfer
- Text editors for code editing
- Microsoft Office suite, Google Chrome and 7-Zip
|
Currently, the following processes apply for installing libraries / packages within the MIDL environment:
- Stata MP: Packages signed by StataCorp can be installed using the
ssc install command. These packages are installed directly to your H: drive and will be available (same project) the next time you login. To install other packages or libaries, please contact the MIDL Service Desk to create a service ticket to progress your request.
- R: A number of popular R packages for data & analytics are already installed. To install other packages, please contact the MIDL Service Desk to have additional packages installed. Please note these packages are installed directly to the Windows install folder and will be reflected on all project across the MIDL. Further vetting will be carried out by MI Data & Analytics prior to install.
|
| 6. Tranferring files in to and out of MIDL |
|
MIDL's data gateway is implemented using custom workflows within a content collaboration tool known as ShareFile.
It is a secure file sharing and transfer service that is built into each virtual desktop and allows users of MIDL to send files to their appropriate projects
and take outputs (after analyses) out of MIDL.
ShareFile allows approval settings to be set up such that these actions will need approval from the project's relevant data custodian or delegated authority.
This allows MIDL to control for the content being brought in to MIDL and taken out of MIDL which is an essential part to protecting data privacy of data contained within MIDL.
|
| Transferring files out of MIDL |
- Access THIS PC using the instructions Section 4 to see the mapped storage drives associated with your project.
- Navigate in to your D: DATA drive.
- In here there is a folder titled DATA CURATION. This folder has two folders inside it named INPUT and OUTPUT.
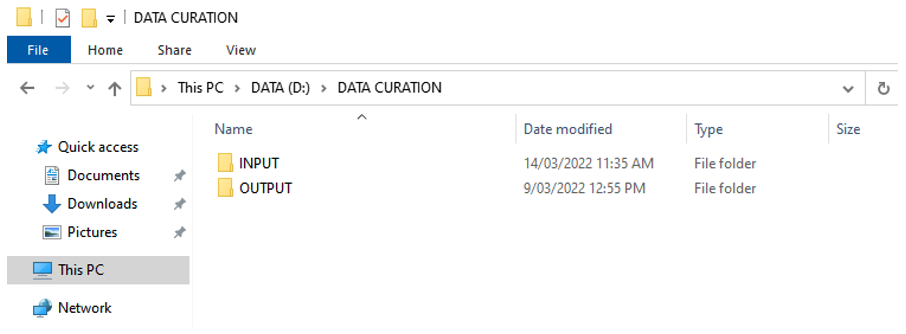
- INPUT is the folder that you place files to from outside the MIDL environment (see instructions below) to transfer files in to your MIDL project.
- OUTPUT is the folder that you place files to from inside the MIDL environment to take files out of your MIDL project.
- To transfer files out of MIDL, place your files in the OUTPUT folder.
IMPORTANT NOTE: It is recommended you copy all of your files in to a folder with a relevant name and the date of the transfer and zip this folder! This can be done by right clicking on the folder, selecting 7-zip > Add to "foldername.zip" (where "foldername" is the name of your folder).

- IF your project has output vetting/clearance controls applied then you must raise a service ticket by emailing the MIDL Data Vetting Team.
- Tickets are to be raised for data vetting activities with the MIDL Data Vetting Team via email to datavetting@midl.unimelb.edu.au.
- Include the following information in your email to the MIDL Data Vetting Team:
- Subject line e.g. M008 Data vetting request
- Project name: e.g. M008
- Direction of file transfer: Input to MIDL OR Output from MIDL
- File names to be vetted
- Any additional comments with statistical information relevant to the request.
- The Data Vetting Team will use this ticket to contact you regarding any concerns or outcomes of the vetting process.
- Once approved, your outputs will be migrated to the OUTPUT folder within your ShareFile shared folder (please see below for more details).
- IF your project does NOT have output vetting/clearance controls applied
- Within 10-15 minutes, our scripts will execute and this zipped folder will be moved in to the OUTPUT folder within your ShareFile shared folder (please see below for more details).
- You can access your released outputs from outside MIDL via accessing ShareFile from your MyApps homepage, or by accessing https://midl.sharefile.com/dashboard.
- The folders in Citrix ShareFile outside the MIDL are organised by all the projects that you have access to.

- They have the following syntax: <PROJECT NUMBER> - <PROJECT NAME> and options of INPUT or OUTPUT depending on the direction of file transfer.
- If you are taking files out of your MIDL project, please check the OUTPUT folder that you used above in these instructions.
|
| Transferring files in to MIDL |
- After you login to MIDL using the instructions above, before you are presented with your project options, you arrive at this screen that has two applications.
- From here, selecting ShareFile opens up the Citrix ShareFile web portal where you can access your shared folders that allow you to a) upload files to your project or b) download files that have been approved to be taken out of your project. Alternatively, you can navigate to https://midl.sharefile.com/dashboard once you have completed your multi-factor authentication challenge.
- The next screen you will be presented with is the Citrix ShareFile Dashboard.

- From here, select Folders in the left hand side bar and then select Shared Folders from the drop down box that appears.
- This opens a window like the one shown below where you can see a shared folder for every project you have access to inside the MIDL.
- The folders in Citrix ShareFile outside the MIDL are organised by all the projects that you have access to.
- They have the following syntax: <PROJECT NUMBER> - <PROJECT NAME> and options of INPUT or OUTPUT depending on the direction of file transfer.
- Select the appropriate INPUT folder (as per the project you wish to transfer the file to) to transfer files in to your MIDL project. If your project has output vetting/clearance controls applied, then this will trigger a notification for the designated approver to check the files.
IMPORTANT NOTE: It is recommended you copy all of your files in to a folder with a relevant name and the date of the transfer and zip this folder!
- Within 10-15 minutes, our scripts will run (if approval is not required) and this zipped folder will be moved in to the INPUT folder within your relevant MIDL project inside the MIDL environment.
|
| 7. Signing out of MIDL |
- To log out of your desktop and close your session, select the Start button and click on the Power button. Selecting Shut down would power down your desktop and close all applications down. Please ensure your activity and progress on any data analysis has been saved prior to selecting this option.
- To temporarily disconnect your desktop, click on the down arrow at the top of your virtual desktop to open the Citrix receiver options drawer. Select Disconnect to disconnect from your virtual machine. By selecting this option, the next time you log in, your desktop and data will be just as you left them.
|
| 8. Support |
| Contact details |
If you experience any issues with the steps outlined in this guide or accessing the MIDL, please contact the MIDL Service Desk team. Please note that that emails to this address will be automatically rejected if you email using an email address different to that noted in the MIDL application.
If you are not an existing user of MIDL, or your email address has changed, please contact the MIDL Service Desk team using this method.
|
| Maintenance windows |
| MIDL undergoes regular planned maintenance every Thursday night between 10pm and 12am. Please ensure all project work has been saved and you have disconnected from your Virtual Desktop before this time. |
| In the event there is the need for additional maintenance work or unplanned maintenance work that is required outside this window, we will directly communicate this with all our users via email. |
| Known issues |
These are some steps to remediate common issues when accessing the MIDL:
- Please ensure your computer is up to date with latest patches and updates for your operating system.
- Please ensure you have the latest version of Citrix Workspace on your computer. Citrix Receiver is not recommended to be used.
- If you regularly access other secure data enclaves that use a Citrix solution for desktop virtualisation, you may need to ensure your browser is in incognito mode or private browsing mode.
- After selecting your workspace to access from the Citrix Workspace Launch window, you may have to wait a few minutes for the window to open. This is normal behaviour. Do not click the icon after the scrolling animation at the top of the icon has started.
|

